


Bondo Body Filler for Automotive Repair
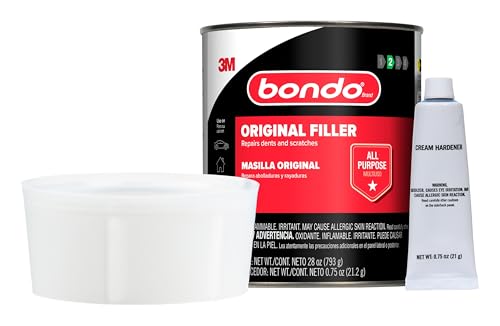
Our original Bondo body filler has been the trusted choice of professionals and DIYers for over 60 years. This two-part polyester resin formula fills dents, scratches, and rust damage on vehicles while creating a smooth, sandable surface ready for primer and paint.
Whether you're restoring a classic car or repairing collision damage on your daily driver, Bondo body filler bonds permanently to metal, fiberglass, and wood substrates. The cream hardener included with every can ensures precise mixing and rapid curing, so you can sand and finish your repair in under 30 minutes.
Formula & application specs
Formula & Chemical Composition
Bondo body filler consists of a polyester resin base combined with talc and other mineral fillers that create bulk and sandability. The two-part system requires mixing the tan-colored filler with the included red cream hardener at a ratio of approximately 2% hardener to filler by volume.
The hardener contains benzoyl peroxide, which initiates a chemical curing reaction when blended into the base resin. This exothermic process transforms the spreadable paste into a rigid, rock-hard surface within 15-25 minutes at temperatures above 60°F. Cooler shop temperatures may extend working time, while warmer conditions accelerate the cure.
Surface Preparation & Application
Cleaning & Grinding
Proper surface preparation determines repair longevity. Remove all paint, rust, and contaminants from the damaged area using 36-grit or 80-grit sandpaper on a dual-action sander. Bare metal should show a bright, clean finish with visible scratch patterns that create mechanical grip for the filler.
Wipe the prepared area with acetone or lacquer thinner on a lint-free cloth to remove sanding dust and oils. The surface must be completely dry before applying car bondo.
Sanding & Finishing Techniques
Allow Bondo body filler to cure fully before sanding—typically 20-30 minutes after application. The surface should feel hard and no longer tacky when pressed with a gloved finger. Attempting to sand partially cured filler will clog your sandpaper and create an uneven surface.
Begin shaping with 36-grit or 80-grit paper on a long sanding board to level high spots and create a flat plane across the repair. Progress through 120-grit and 180-grit to refine the surface and feather edges into surrounding metal. Keep the sanding board flat and use long, overlapping strokes rather than circular motions.
Complete Your Auto Body Repair Kit


Rated 4.8 by verified buyers


Common Questions About Bondo Body Filler
Apply car bondo no thicker than 1/4 inch per layer to ensure complete curing. Thicker applications can trap solvents and create soft spots that won't sand properly.
For deeper damage, allow each 1/4-inch layer to cure fully (20-30 minutes) before applying the next coat. Alternatively, use fiberglass resin with mat to fill large voids, then finish with a thin layer of body filler for smooth sanding.
No, Bondo body filler must be applied to bare substrate for proper adhesion. Sand through paint and primer to expose clean metal, fiberglass, or wood before application.
Filler applied over paint will eventually delaminate due to weak chemical bonding. The sanding process also helps create mechanical grip through surface scratches that lock the filler in place.
Bondo body filler cures in 15-25 minutes at room temperature (70°F). The surface should feel completely hard and non-tacky before sanding begins.
Colder shop temperatures extend cure time, while temperatures above 80°F accelerate hardening. You can reduce working time by adding more hardener, but never exceed a 3% hardener ratio as excess catalyst creates brittle, crack-prone repairs.
Properly resealed Bondo body filler remains usable for 6-12 months after opening. Clean hardened material from the lid rim and ensure an airtight seal after each use to prevent solvent evaporation.
Unopened containers last 2-3 years when stored between 50°F and 90°F away from direct sunlight. The red cream hardener should be replaced if it becomes lumpy or separates, as degraded hardener produces inconsistent curing.
Standard car bondo should not be used on flexible plastic bumpers, as the rigid cured filler will crack when the bumper flexes. Use a dedicated flexible filler with plasticizer additives designed for TPO and urethane bumper materials.
Bondo body filler works well on rigid fiberglass and hard ABS plastics found on classic car components and aftermarket body panels. Always test adhesion on a small area first.
Yes, apply automotive primer over sanded Bondo body filler within 24 hours of final sanding. Unsealed filler can absorb moisture from the air, which may cause paint adhesion problems and surface defects.
Use a high-build urethane or epoxy primer designed for bare substrates. Two coats of primer seal the filler, provide uniform color for topcoat coverage, and allow wet-sanding for final smoothness before paint.
Squeeze a ribbon of red cream hardener roughly 2% of the filler volume onto your mixing board—about a golf ball size per softball-sized portion of filler. Fold the two components together with a clean spreader until the mixture shows uniform pink color with no streaks.
Too little hardener extends cure time and may leave tacky spots. Too much hardener shortens working time and can create brittle repairs. The color-changing formula makes it easy to verify complete mixing.